
1. Getting started
One you completed the quickstart, you should have your IDE (VS Code, Visual Studio Code, is used in these tutorials) running the StoryScript code and your browser showing you your StoryScript game:
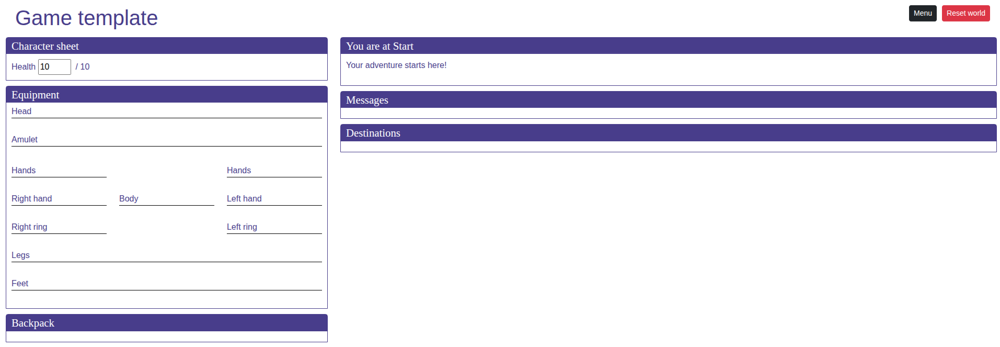
If that's not what you're looking at, complete the quickstart first.
Show your work in progress
One of the great things about StoryScript is that you can create your game while playing it. The changes you make to your code in your IDE (most of them anyway, exceptions will be noted in these tutorials) will be reflected in your game running in your browser right away. This does depend on you saving the changes that you make to files, so you should configure VS Code to save changes automatically. That takes three steps:
- Find the settings via File -> Preferences -> Settings.
- Find the Files section of the User Settings.
- Set Auto Save to 'afterDelay' and Auto Save Delay to e.g. '2000'.
With that done, have your IDE and browser displayed next to each other (either on one screen or two separate ones). Now you can see any change you make to your game right away.
Set up your game UI
You can make StoryScript look, feel and sound exactly the way you want it to using custom interface texts, the StoryScript UI components and basic HTML and CSS techniques.
Custom interface texts
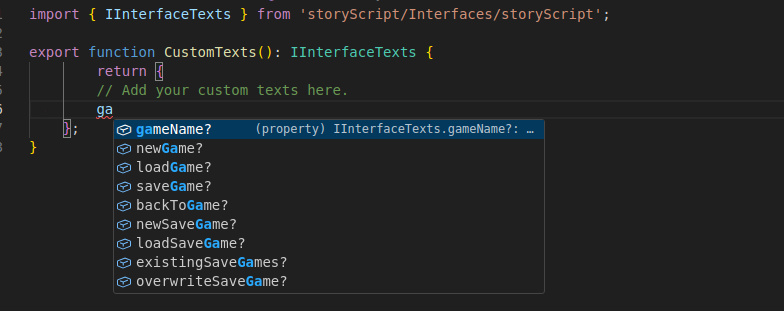
Let's start with some custom texts. Right now, your game is called 'Game template'. To change this, go to your game's folder (located in src/Games), find the customTexts.ts file and open it. Place your cursor below the line '// Add your custom texts here'. Start typing gameName and press TAB as soon as it is highlighted:
Type a colon (':') and then the name of your game between single quotes. So you'll end up with something like 'gameName: 'My New Game''. You should see the name of your game updated in your browser.
Let's also change the text that says 'you are at Start'. 'Start' is the name of the location you're currently at, so that should somehow be injected into your custom text. For that, placeholders are used. Type a comma after your new game name and start adding a custom text for 'youAreHere'. Use 'Chapter {0}' as the value. '{0}' is the placeholder, so it will be replaced with the current location name. Your browser should now show 'Chapter Start'.
StoryScript UI components
The StoryScript UI uses the Vue framework and is composed with Vue components. Chances are that you won't be needing all of the components present by default, so StoryScript allows you to easily create your own component composition. You can also create your own custom Vue components if you want to! For now, we'll stick with the easy stuff and just change the default composition.
Copy the GameContainer.vue file from the 'src/UI/Components' folder to your game's 'ui/components' folder (add this folder when it does not exist). As we're just getting started, let's create a nice and easy composition. Change the code between the <template> tags so you end up with this:
<template>
  <div class="container-fluid body-content">
    <div class="row">
      <div id="location-container"
           :class="{ 'col-8': game.state === 'Play' && showCharacterPane, 'col-12': game.state !== 'Play' || !showCharacterPane }">
        <div v-if="!game.state">
          {{ texts.loading }}
        </div>

        <div v-if="game.state === 'Play'">
          <location-text></location-text>
          <exploration></exploration>
        </div>

      </div>
    </div>
  </div>
</template>
This is one case in which StoryScript doesn't fully update your browser to the latest state. You should see that only two boxes are left, location text and exploration, but that they don't span the full screen. Refresh the browser page to fix that.
WARNING: when you update your GameContainer.vue file later on to add new components, be sure to change ONLY the HTML between the <template> tags and leave the <script> section intact!
HTML
Apart from the StoryScript components that make up the UI, you can also use HTML to enrich the content some of those components are showing. The <location-text> component shows you the description of the current location. Right now it's just some text, but you can use HTML markup, images and more.
As an example, we'll add a picture to the description of the Start location. Open the Start.html file in your game's 'locations' folder, and add an image tag after the paragraph tag, like this:
<description>
    <p>
        Your adventure starts here!
    </p>
    <img src="resources/owl.jpg" alt="Owl" />
</description>
Add a picture to the 'resources' folder of your game (add the folder when it isn't present yet) that's called 'owl.jpg'. The picture should show below the text.
NOTE: the path to the resources folder should NOT start with a '/'! This way, the resources will be resolved correctly when your game is not hosted at a website's root folder.
CSS
With CSS, you can change the look of your game by changing the fonts used, the size of the fonts, the colors, etc. StoryScript leverages the Bootstrap CSS framework for the basic look and feel of the games, and games can override these styles from the game.css file in their 'ui/styles' folder.
As an example, let's remove the Destinations header and the space between the blocks to make them look like one block with a divider. Add these styles at the bottom of the game.css file:
#location {
    margin-bottom: 0px;
}

#exploration-destinations {
    border-top: none;
    border-radius: 0;
}

#exploration-destinations > .box-title {
    display: none;
}
NOTE: if you want to use images from your resources folder in your css, e.g. to add a background image, you need to use this format to resolve it:
background-image: url($resources/your_image.png);Working on multiple games
You can work on more than one game in one StoryScript repository, and switching between them is trivial. In the root of your repository, you'll find the currentGameName.js file. When you create a new game, this file will be modified and the only content it has, the gameName, will be updated to match your new game. You can switch between games at any time by changing the gameName in this file to the game you want to work on. Your browser will refresh and show you the game selected right away!