
2. Interactive stories
Creating interactive stories was the first use case of StoryScript, and they are the easiest game type to create. Also, they introduce the important StoryScript concepts of Locations and Destinations, which are at the core of any StoryScript game.
In an interactive story, you are presented two or more options after reading a small part of the story. The reader thus determines what the actual story will be. Here, each part is represented as a StoryScript location. Each option you have for a story part is represented by a destination, and destinations link locations together. Thus, locations and destinations create a web of linked nodes that present every possible way in which the story can unfold.
For an interactive story, we need only a few of StoryScript's components. In fact, the UI we created in tutorial 1 will do nicely. If you haven't completed that tutorial yet, do so now and then return to this one.
So, we have the browser running our StoryScript game with two blocks. The top one has the text for this part of the story, the lower one will have the options available to the user. First, replace the default text 'Your adventure starts here' with the first part of your story in the Start.html file. Next, we'll add the options available to the reader. You do this by adding destinations to the Start.ts file.
For your convenience, StoryScript comes with VS Code code snippets that are set up when you create your first game. You can use these to automatically add StoryScript code parts, like a new destination. Rider code snippets are available as well, but you need to install these yourself. You can find the snippets (called Live Templates in Rider) in the LiveTemplates folder of your repository, and instructions on how to install them in the 'import live templates' section here.
Place your cursor on the line between the [] of the destinations property of your Start location, and start typing ssDestination (for StoryScript Destination):
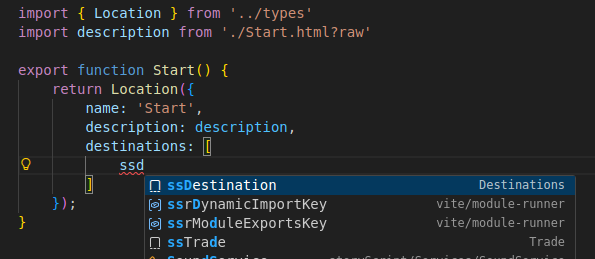
Press TAB to complete it, and type the text for your option for the name property, e.g. 'Walk towards the clearing':
destinations: [
{
name: 'Walk towards the clearing',
target: null
},
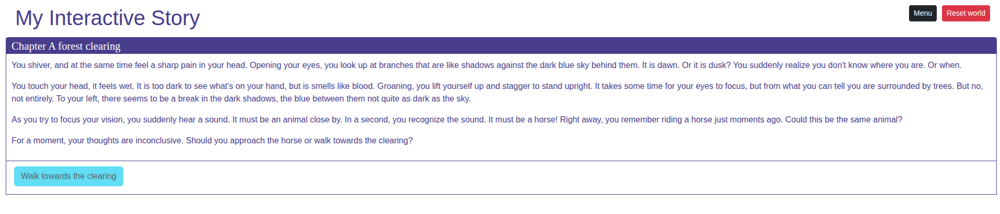
]Your browser should now be showing you the option to 'Walk towards the clearing' below the story part you wrote.
It is not yet clickable, as no destination target is specified yet. To set that target, we need to create a second location to hold the next part of the story that describes what happens when you walk towards the clearing.
StoryScript also has some commands that let you create StoryScript entities like locations quickly. To create a new location for your game, open a second terminal in your IDE and run this command:
npm run scl ClearingThe S(toryScript) C(reate) L(ocation) command created two new files for you, both the HTML and TS file that together make up your new location. Now, you can activate your 'Walk towards the clearing' option by going back to the Start.html file and replace the 'null' value of the destination by starting to type the name of your new location and pressing TAB to complete it. This way, the required TypeScript import is added automatically and everything should work. Clicking the 'Walk towards the clearing' destination in your browser takes you to your new location.
Now that you are at your second location, you'll notice there is no way back. In an interactive story that makes sense (at least in the majority of cases, maybe there are exceptions), but when you're creating your game you need a way to quickly move between the parts of your story to work on it efficiently. For this, StoryScript is now showing you a 'Jump to location' type ahead input, with which you can find all your locations and move between them. Of course, this input will not be available when the game is published.
Well, that's it! By creating more locations and destinations, you can write the interactive story you want. Nothing more is needed. Remember that as you're working with HTML, you can add pictures and media as well. See tutorial 1 for an example of how to add a picture to your story text. And refer to the MyInteractiveStory demo in your Games folder to see the full code. You can find the demo running here.